5 Tips for Beginning and Maintaining a Successful Orff Ensemble
When I first began teaching elementary music, I was fresh out of college and had never set foot in an elementary classroom. When I fell in love with teaching elementary, I knew I needed to gain some more experience and naturally gravitated to the Orff process. If you want more information on the Orff Schulwerk you should check out the AOSA webpage. After teaching for about six years, I decided it was time for me to start an Orff ensemble at my campus. I have learned a lot over the last 7-8 years and would like to share my experiences with you. Here are the top 5 things I learned when beginning and maintaining a successful Orff ensemble.
1. Choose a really good name
You thought I was going to start with something pedagogical or about recruitment, didn’t you? Nope. Choosing the name for the ensemble is pretty important. When I selected the name of my ensemble, I thought of several words that were synonymous with music or sound. You’ll want to choose something that maybe has some alliteration with your campus name or mascot, something that your students can connect with. As the years have gone on, the name of my ensemble, Resonance, has become harder for the children to pronounce and relate too, but I believe that is the lapse of two years of performing.
2. Hold Auditions
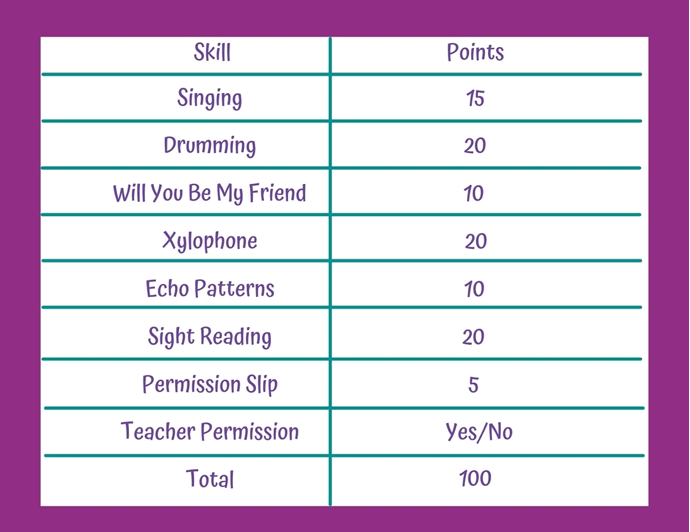
I choose to hold auditions to narrow the number down to about 30. I have found that more than 30 is really difficult to manage, especially when it comes to writing parts. I use a rubric that looks like this:
I give the students a packet with the music and links to videos (on my YouTube channel) to watch to prepare for their auditions. On audition day, I have the instruments set up and ready to go with copies of the music, on music stands (or they can use their own) and my iPad set up to record their audition. I record for two reasons, one, for me and my ADHD so I don’t miss anything, two, in case a parent questions their child’s ranking and acceptance. I can show the video and discuss what the weaknesses were. I listen to their audition, rate their score, and select the top 30 students. I do take into consideration their grade level to a small extent. If number 30 is a third grader and 31 a fifth grader and their scores are neck and neck, I may choose the fifth grader, since I want that fifth grader hooked on music before leaving for middle school. I do not always consider their grade level, but on rare occasions I do. I have a different scoring system for each grade level and adapt the rubric to reflect their grade level and skill level.
3. Be prepared to write arrangements
In my Orff levels I learned how to write arrangements for folk songs to fit the needs of my students. Now, with that said, writing for your percussion ensemble is kind of a different beast. I’ve had to write songs to go with books, arrange pop-songs (which means getting the appropriate permission), and add percussion parts to existing orchestrations to fill out an ensemble. It is incredibly time consuming, unless choose to use other people’s arrangements, which is fine, but gets expensive, too.
When I first started my ensemble, I used pieces we had done in class and just added more unpitched percussion parts and some contra bars. I basically take what they’re already learning and level it up. Now, I tend to choose a theme or book to structure the performance around and choose music to fit those ideas.
4. Prepare Rehearsals Ahead of Time
Anyone who runs an ensemble knows how crucial planning your rehearsal time is. When running a rehearsal, you have the parts of the music you want to work on, the parts the ensemble NEEDS to work on and then the parts that neither of you knew would fall apart and need to be worked on. I create a loose timeline of how and when I want things taught, and then I work around what the ensemble needs. Planning is great but be flexible. I teach one to two songs at a time so as not to confuse the children and bounce around between 4-5 pieces.
If you plan ahead enough, you can create practice videos for your students to watch and prepare at home. I give my students a paper xylophone to practice on and show them how to practice on body percussion or found sound objects so they can practice at home.
5. Comparison is Not Pretty
Do not compare your current chapter in your story to someone’s finished novel. If you are just starting out, or you’re having funding issues, or instrument issues, or whatever the case may be, comparing your group’s success to someone else’s will sink your ship before it ever sets sail. I work in a district that is very diverse. My ensemble is not going to perform to the same level as someone who has been performing for 20 years, my ensemble struggles with parent commitment/involvement, therefore a lot of the work goes on during rehearsal. We don’t all have access to devices at home all the time so expecting the children to practice at home does not always happen. I try to celebrate our strengths and highlight things we can do really well and work with the strengths of the ensemble. I am a firm believer that kids are kids and socioeconomic status should not change how we teach kids, however the hard truth is that it does. Access to materials, parent involvement, and the like, are all going to contribute to your ensemble’s success. I strongly believe you can find their strengths, write/arrange music to fit those strengths and create a dynamic Orff ensemble at your school.
Sing! Say! Dance! Play! Care!
Analisa